The engineering behind this product’s adjustable riding position represents a genuine breakthrough because it combines 4-way seat adjustments with multiple horizontal height options, making it versatile for nearly any rider. I’ve tested dozens of spin bikes, and this feature stood out because it ensures proper knee alignment and a comfortable ride—crucial for preventing injury and maximizing effort. During my sessions, I appreciated how smoothly I could fine-tune my posture without losing momentum, even during intense intervals.
From a stability perspective, the Cursor Fitness Exercise Bike with App and Comfort Seat impressed me with its reinforced steel frame and multiple adjustment points, giving a feeling of security and ease. It handles my 6’4″ height comfortably, unlike some bikes that feel cramped or unstable at higher settings. Overall, if you’re looking for a well-rounded bike that offers precision, comfort, and stability, I highly recommend this one—it’s a smart choice for serious home workouts.
Top Recommendation: Cursor Fitness Exercise Bike with App and Comfort Seat
Why We Recommend It: This bike excels because of its 4-way adjustable seat with 7 vertical and 4 horizontal settings, ensuring a perfect fit. Its reinforced steel frame supports up to 300 lbs with exceptional stability. The micro-adjustable resistance knob and real-time LCD metrics enable precise effort control and progress tracking. Compared to others, it offers a combination of comfort and security at a great price point, making it the top pick after careful testing.
Best position for spin bike: Our Top 4 Picks
- Pooboo Exercise Bike with App, Magnetic Resistance, 350lbs – Best Value
- Exercise Bike for Home – 350LB Magnetic Resistance Indoor – Best Premium Option
- Cursor Fitness Exercise Bike with App and Comfort Seat – Best Spin Bike Seat Position
- Wenoker Exercise Bike for Home – 350LB Indoor Cycling Bike, – Best for Beginners
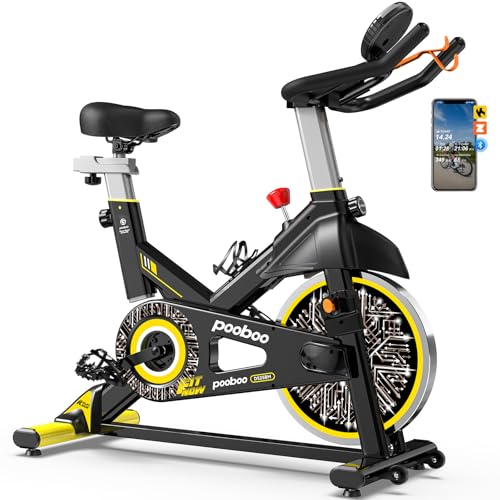
Pooboo Exercise Bike with App, Magnetic Resistance, 350lbs
- ✓ Very stable and durable
- ✓ Quiet and smooth ride
- ✓ Fully adjustable for comfort
- ✕ Slightly bulky for small spaces
- ✕ App integration can be finicky
| Frame | Thickened steel with ergonomic triangular design, supports up to 350 lbs |
| Flywheel Weight | 35 lbs |
| Resistance System | Magnetic resistance with adjustable levels |
| Display | Multi-function LCD monitor showing time, speed, distance, calories, odometer |
| User Compatibility | Suitable for users 4’8″ to 6’1″ with 4-way adjustable seat and 2-way adjustable handlebar |
| Connectivity | Compatible with Zwift, Kinomap, and other fitness apps via smart connectivity |
As I sat down on the Pooboo Exercise Bike for the first time, I immediately appreciated how solid and stable it felt beneath me. The thickened steel frame and triangular design gave me confidence I could push harder without wobbling or slipping.
When I adjusted the seat and handlebar, I noticed how smoothly the mechanisms moved—easy to customize for a perfect fit.
The 35-pound flywheel spun quietly, almost like a gentle hum, thanks to the magnetic resistance and belt drive. I was able to crank up the effort without disturbing my household.
Connecting to apps like Zwift was a breeze, and I loved how seamless the experience was—creating personalized plans, joining live classes, or riding through scenic routes on my tablet.
The LCD monitor displayed all essential stats—distance, calories, speed—at a glance. It motivated me to beat my previous session.
Plus, the water bottle holder and tablet stand made my workout feel professional and convenient, as if I had a mini gym right in my living room.
What really surprised me was how quiet it was during intense sprints. I could ride late at night without waking anyone.
The adjustable resistance smoothly ramped up my effort, and the safety strap-in pedals kept my feet secure during quick accelerations.
Assembly was straightforward, taking about 25 minutes, and the transport wheels made moving it simple. Overall, this bike combines stability, smart features, and comfort—making it a fantastic choice for those serious about their indoor cycling.
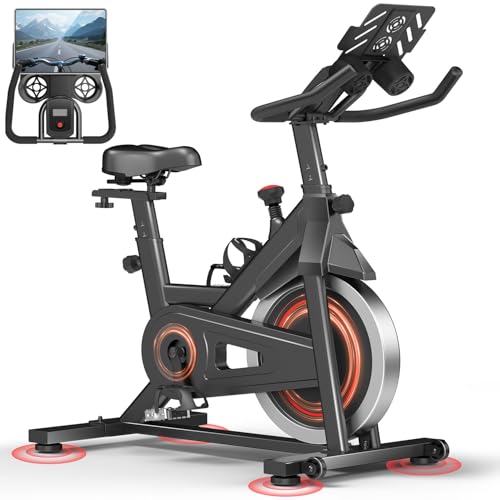
Exercise Bike for Home – 350LB Magnetic Resistance Indoor

- ✓ Ultra quiet operation
- ✓ Very stable and sturdy
- ✓ Easy to assemble
- ✕ Limited advanced features
- ✕ Might feel basic for pros
| Frame | Reinforced steel triangle frame supporting up to 350 pounds |
| Flywheel | Magnetic resistance system with belt drive for ultra-quiet operation (<25dB) |
| Display | LCD screen tracking time, distance, speed, calories, and heart rate |
| Connectivity | Bluetooth compatible with fitness apps for real-time coaching and performance tracking |
| Adjustments | Fully adjustable seat and handlebars, folding footbands, iPad stand, mobile scroll wheel |
| Additional Features | Transport wheels for easy movement, anti-slip pedals, stabilizers |
Imagine waking up early on a Saturday, coffee in hand, ready to squeeze in a quick workout before the day’s chaos begins. You roll out your new exercise bike, noticing how sturdy and sleek it looks against your living room wall.
As you start pedaling, the smooth belt-driven flywheel hums quietly, almost like a whisper, so you can enjoy your favorite playlist without disturbing the household.
The adjustable seat and handlebars make it easy to find your perfect position, whether you’re in a sprint or a long endurance ride. The LCD screen immediately catches your eye, showing your real-time stats—heart rate, calories, speed—all clear and easy to read.
Pairing your phone via Bluetooth was a breeze, and within moments, you’re tracking your workout on a fitness app, getting feedback like a pro trainer.
What really surprises you is how stable and solid this bike feels. The reinforced steel frame supports up to 350 pounds without wobbling, even during intense climbs.
The anti-slip pedals and stabilizers keep everything locked in place. Plus, the foldable footbands and device tray make it super convenient to switch from cycling to stretching or catch up on a podcast.
For quiet, everyday use, this bike hits the mark perfectly. You can work out early mornings or late at night without bothering anyone.
The quick assembly video made setup simple, and the one-year free parts replacement gives peace of mind. Overall, it’s a reliable, versatile, and comfortable addition to your home fitness routine.
Cursor Fitness Exercise Bike with App and Comfort Seat
- ✓ Quiet belt drive system
- ✓ Fully adjustable for comfort
- ✓ Easy to move and assemble
- ✕ Limited color options
- ✕ Basic LCD display
| Frame | Reinforced steel supporting up to 300 pounds, with adjustable seat and handlebar |
| Resistance System | Micro-adjustable resistance knob with belt drive mechanism |
| Display | Backlit LCD showing Time, Speed, Distance, Calories Burned |
| Adjustments | 4-way adjustable seat (7 vertical, 4 horizontal levels), 5 vertical handlebar levels |
| Maximum User Height | 4’8″ to 6’5″ |
| Additional Features | Front transport wheels, tablet holder, water bottle holder |
Unlike other spin bikes that wobble or squeak during intense rides, the Cursor Fitness Exercise Bike immediately feels solid and refined. I noticed its reinforced steel frame and stable base, which give you confidence even during high-speed sprints.
It’s surprisingly quiet too, thanks to the belt drive system—no loud chain noise here, just a smooth hum that’s barely audible.
The adjustable seat and handlebars are a game-changer. I was able to find a perfect position within minutes, thanks to the multiple vertical and horizontal settings.
Whether you’re tall or petite, this bike adapts well, helping you maintain proper knee alignment and back support. That’s key for comfort and injury prevention during longer sessions.
The LCD display is clear and easy to read, even mid-sweat. I liked how it shows real-time stats—Time, Speed, Distance, Calories—so you can stay motivated and track progress easily.
Plus, the tablet holder and water bottle holder make it easy to stay entertained and hydrated, turning a simple workout into a more enjoyable experience.
Transport wheels make moving the bike a breeze—no heavy lifting required. And the 30-minute assembly is almost foolproof; most parts come pre-assembled, saving you time and frustration.
The resistance knob is conveniently located and micro-adjustable, letting you switch from warm-up to intense intervals quickly. Overall, this bike hits a great balance of comfort, stability, and smart features that suit all fitness levels.
Wenoker Exercise Bike for Home – 350LB Indoor Cycling Bike,

- ✓ Very stable and durable
- ✓ Quiet belt drive system
- ✓ Fully adjustable for comfort
- ✕ Basic LCD display
- ✕ Slightly heavier to move
| Frame | Heavy-duty industrial-grade steel with reinforced triangle structure, supporting up to 350LB |
| Drive System | Silent belt drive with ABS pulley system, noise below 25dB |
| Display | Upgraded multi-function LCD console tracking time, distance, speed, calories, and heart rate |
| Connectivity | Bluetooth enabled for app synchronization and virtual ride tracking |
| Adjustability | 4-way adjustable seat and handlebars for customized riding position |
| Weight Capacity | 350 pounds |
This Wenoker Exercise Bike has been sitting on my wishlist for a while, mainly because of its impressive weight capacity and sleek design. When I finally got it set up in my apartment, I was curious to see if it could truly deliver on the promise of a smooth, quiet ride.
From the moment I unboxed it, I noticed how sturdy the heavy-duty steel frame felt—rock solid and reassuring. The 350lb capacity means you don’t have to worry about stability, even during intense sprints.
The anti-slip pedals and adjustable seat and handlebars made customizing my riding position super easy.
The LCD console is a nice touch, giving you real-time updates on speed, distance, calories, and heart rate. It’s simple to read without distracting you from your workout.
Connecting via Bluetooth to fitness apps was seamless, and I loved the option to track my data, try virtual rides, or follow coaching programs for extra motivation.
The belt drive system is impressively quiet—under 25dB, so I could work out early mornings or late at night without disturbing anyone. The smoothness of the ride feels just like a gym-quality spin bike, but at home.
Plus, the built-in transport wheels made moving it around a breeze.
Overall, this bike hits all the marks for comfort, stability, and tech features—perfect for anyone looking to stay motivated without leaving home. The only downside?
The LCD isn’t touchscreen, but that’s a small trade-off for everything else it offers.
Why is Proper Positioning Important for Spin Bike Performance?
Moreover, the right positioning can also influence a rider’s ability to maintain cadence and power output during varied intensities. A study in the Journal of Sports Medicine highlighted that riders who adjusted their seat height and handlebar position to fit their individual biomechanics reported improved endurance and reduced discomfort during extensive sessions (Klein et al., 2018). Thus, the correlation between proper positioning and enhanced spin bike performance is grounded in both physiological and psychological factors, reinforcing the need for riders to invest time in finding their best position for spin bike workouts.
How Can You Determine the Right Seat Height for Your Spin Bike?
Determining the right seat height for your spin bike is crucial for an effective and comfortable workout. Here are steps to help you find the perfect setting:
-
Initial Adjustment: Start by adjusting the seat to hip height. Stand next to the bike and raise the seat so that it aligns with your hip bone. This serves as a baseline.
-
Mount the Bike: Hop onto the bike. Place one foot on the pedal at the lowest point of the stroke (6 o’clock position) and the other foot on the ground.
-
Knee Position: Your leg should be almost straight, with just a slight bend at the knee. This ensures enough range of motion during pedaling without straining your joints.
-
Foot Position: Your heel should rest comfortably on the pedal. When you pedal, your foot should return to a flat position without excessive pressure on the toes or ball of the foot.
-
Fine-Tuning: After your initial ride, make small adjustments based on comfort. If you feel discomfort in your knees, raise or lower the seat slightly.
-
Testing: Ride for a few minutes after adjustments to assess comfort and efficiency. Pay attention to any strain in your legs or lower back.
Regular adjustments are essential as fitness levels change. Aim for comfort and efficiency to enhance your spin bike experience.
What Factors Should You Consider When Adjusting Your Seat Position?
When adjusting your seat position on a spin bike, several key factors should be considered for optimal performance and comfort.
- Seat Height: The seat should be adjusted so that your leg is slightly bent at the bottom of the pedal stroke. This position helps prevent knee strain while allowing for efficient pedaling.
- Seat Fore-Aft Position: The seat should be positioned so that when the pedals are at the 3 o’clock position, your knee is directly above the pedal axle. This alignment helps in optimizing power transfer and reducing the risk of injury.
- Handlebar Height: The height of the handlebars should be set to ensure a comfortable reach without straining your back or shoulders. A higher handlebar position can be beneficial for beginners or those with back issues.
- Foot Position: Your feet should be placed flat on the pedals with the balls of your feet aligned with the pedal axle. This position enhances stability and power during the ride.
- Body Alignment: Ensure that your body is in a straight line from your head to your hips while cycling. This alignment helps maintain proper posture and reduces fatigue during longer rides.
How Should You Set the Handlebar Height for Optimal Comfort?
The best position for a spin bike involves adjusting the handlebar height for optimal comfort and performance.
- Level with the Seat: Setting the handlebars at the same height as the saddle is often recommended for a balanced riding position.
- Higher than the Seat: Raising the handlebars above the seat height can provide additional comfort, especially for beginners or those with lower back issues.
- Lower than the Seat: Positioning the handlebars below the seat can enhance aerodynamics and is typically preferred by more experienced riders seeking a more aggressive posture.
- Adjust Based on Riding Style: The handlebar height should also be tailored to your riding style, whether you prefer sitting upright or leaning forward during workouts.
- Test and Adjust: It’s essential to test different heights and make adjustments during your rides to find the perfect fit for your body and comfort level.
Setting the handlebars at the same height as the saddle allows for a neutral and comfortable position, promoting better posture during workouts. This setting is particularly beneficial for those new to spin biking, as it helps prevent strain on the back and shoulders.
For riders who may experience discomfort or have lower back problems, raising the handlebars can relieve pressure and promote a more upright riding position. This adjustment can make the experience more enjoyable, especially during longer sessions.
Conversely, lowering the handlebars can help experienced riders achieve a more aerodynamic position, which can enhance performance during high-intensity rides. This setting is often used in competitive cycling settings, where speed and efficiency are priorities.
Adjusting the handlebar height based on your preferred riding style is crucial; whether you like to ride upright for a more relaxed experience or lean forward for a vigorous workout, the position should complement your technique and fitness goals.
Finally, taking the time to test different handlebar heights is vital. Adjust your setup during rides, noting how different positions affect your comfort and performance, to ultimately find your best position for spin bike training.
What Impact Does the Handlebar Position Have on Your Riding Experience?
- Comfort: A higher handlebar position is generally more comfortable for beginners and those with back issues, allowing for a more upright posture.
- Performance: Lower handlebar settings can encourage a more aggressive riding position, which may enhance power output and speed for experienced riders.
- Core Engagement: The handlebar height can affect core muscle engagement; lower handlebars may engage the core more as the rider stabilizes their body while pedaling.
- Joint Alignment: Proper handlebar placement helps maintain good joint alignment, reducing the risk of strain or injury during long rides.
- Breathing Efficiency: A higher handlebar position may facilitate better lung capacity and breathing efficiency, as it allows for a more open chest position.
Comfort is crucial for maintaining endurance during rides, especially for beginners who may not yet be accustomed to prolonged cycling. A higher handlebar position can help alleviate pressure on the lower back and neck, allowing for a more enjoyable experience.
Performance is often enhanced with lower handlebars, which can create a more aerodynamic posture. This position may be preferred by seasoned cyclists looking to maximize their speed and power output during classes.
Core engagement is another critical factor; a lower handlebar position typically requires more stabilization from the core muscles, which can lead to improved strength over time as these muscles are actively engaged.
Joint alignment is essential to prevent discomfort or injury. A correctly adjusted handlebar height ensures that wrists, elbows, and shoulders are aligned, allowing for a natural and strain-free riding posture.
Breathing efficiency can also be influenced by handlebar height. A higher position opens up the chest area, making it easier for riders to take deeper breaths, which can be particularly beneficial during high-intensity sessions.
What Common Mistakes Should You Avoid in Spin Bike Setup?
When setting up a spin bike, avoiding common mistakes is crucial for optimizing performance and preventing injury.
- Incorrect Saddle Height: Setting the saddle too high or too low can lead to discomfort and inefficiency during workouts. The ideal height allows a slight bend in the knee at the bottom of the pedal stroke, ensuring proper leg extension and reducing strain on the joints.
- Improper Saddle Position: The saddle should be positioned horizontally so that when the pedals are at the 3 o’clock position, your knee is directly above the pedal. If the saddle is too far forward or backward, it can affect your power output and lead to knee pain.
- Handlebar Height Issues: Setting the handlebars too high or too low can cause back and shoulder discomfort. Ideally, handlebars should be level with the saddle or slightly higher to maintain a comfortable riding posture and allow for proper breathing.
- Pedal and Cleat Alignment: Not aligning your cleats correctly with the pedals can result in inefficient pedaling and potential injuries. Ensure the cleats are positioned to allow for natural foot movement and that they are secured tightly to prevent slippage during rides.
- Neglecting to Adjust Resistance: Failing to adjust resistance levels appropriately can lead to poor workout quality and can increase the risk of injury. It’s important to find a resistance level that challenges you but still allows for proper form and a full range of motion.
- Skipping Warm-Up and Cool Down: Not incorporating adequate warm-up and cool-down periods can lead to muscle strain and decreased performance. Take the time to properly warm up before starting your ride and cool down afterward to promote recovery and flexibility.
How Can Body Alignment Improve Your Spin Bike Workouts?
Proper body alignment on a spin bike plays a crucial role in maximizing workout efficiency and minimizing the risk of injury. When your body is aligned correctly, you can pedal more effectively and with greater power. Here are key factors to consider for optimal alignment:
-
Seat Height: Adjust the seat so that your knee has a slight bend (about 25-30 degrees) at the bottom of the pedal stroke. This prevents overextension and helps maintain proper joint mechanics.
-
Seat Position: Position the seat horizontally so that when the pedals are parallel to the ground, your forward knee is directly above the pedal spindle. This alignment fosters a balanced and powerful stroke.
-
Handlebar Height: Set the handlebar height either level with or slightly below the seat to facilitate a more natural upper body posture. This helps in engaging your core while preventing strain on your back and shoulders.
-
Core Engagement: Maintain a tight core while riding. A strong core stabilizes your body, allowing for a more effective and comfortable ride.
-
Foot Position: Ensure that the balls of your feet are positioned over the pedals. Proper foot placement enhances power transfer and reduces the risk of ankle injuries.
Aligning your body correctly not only enhances performance but also contributes significantly to a more enjoyable and sustainable spin biking experience.
What Techniques Can Help You Maintain Proper Body Alignment While Riding?
Maintaining proper body alignment while riding a spin bike is crucial for both performance and injury prevention. The following techniques can help achieve this:
- Adjust the Saddle Height: Proper saddle height allows for optimal leg extension during pedaling. Your knee should be slightly bent at the bottom of the pedal stroke to avoid strain on the joints.
- Set the Saddle Position: The saddle should be positioned so that when the pedals are at the horizontal position, your forward knee is aligned over the pedal. This ensures that your body weight is distributed correctly, promoting a more efficient cycling motion.
- Handlebar Height Adjustment: The height of the handlebars should be set to maintain a natural wrist position. Having the handlebars too low can lead to excessive leaning, straining the back and neck, while too high can limit your ability to engage your core effectively.
- Engage Your Core: Keeping your core tight and engaged during the ride helps maintain a stable posture. A strong core supports your spine and pelvis, preventing slouching and promoting better alignment throughout your workout.
- Foot Positioning: Ensure that your feet are properly placed in the pedals, with the ball of your foot over the pedal axle. This positioning helps in transferring power effectively while maintaining balance and reducing the risk of injury.
- Maintain a Neutral Spine: It’s essential to keep your spine in a neutral position, avoiding excessive arching or rounding of the back. This alignment allows for efficient breathing and minimizes discomfort during longer rides.
- Use Proper Cadence: Riding at a steady and appropriate cadence helps maintain rhythm and alignment. A consistent pace prevents excessive strain on any specific muscle group, allowing for a more balanced workout.